2012-08-14 28 views
5

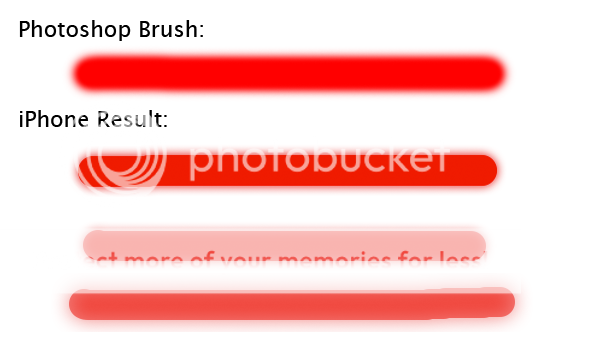
¿Cómo obtener el siguiente efecto de suavidad del pincel (dureza) como photoshop? iOS Dureza del pincel como Photoshop

Mi intento:

CGContextRef context = UIGraphicsGetCurrentContext(); 
CGContextSaveGState(context); 
CGContextSetLineCap(context, kCGLineCapRound); 
CGContextSetLineWidth(context, 30); 
CGContextSetStrokeColorWithColor(context, [UIColor colorWithRed:1.0f green:0.0f blue:0.0f alpha:0.5f].CGColor); 
CGContextSetShadowWithColor(context, CGSizeMake(0, 0), 20.0f, [UIColor colorWithRed:1.0f green:0.0f blue:0.0f alpha:1.0f].CGColor); 
CGContextAddPath(context, path); 
CGContextStrokePath(context); 
CGContextRestoreGState(context); 

Traté de ajustar los valores alfa y el factor de sombra borroso, pero sin resultado satisfactorio.

¿Alguien tiene una solución para esto? Cualquier ayuda sería apreciada.

Respuesta

11

En esta imagen se puede ver el siguiente resultado del código. Creo que es casi igual a lo que quieres.

enter image description here

sombra Sólo exterior no es suficiente para dar ese efecto suave que es por lo que añadir un poco de sombra interior para dar forma con el color blanco.

- (void)drawRect:(CGRect)rect { 

    CGContextRef context = UIGraphicsGetCurrentContext(); 

    // Shadows 
    UIColor* shadow = UIColor.redColor; 
    CGSize shadowOffset = CGSizeMake(0.1, -0.1); 
    CGFloat shadowBlurRadius = 11; 
    UIColor* shadow2 = UIColor.whiteColor; // Here you can adjust softness of inner shadow. 
    CGSize shadow2Offset = CGSizeMake(0.1, -0.1); 
    CGFloat shadow2BlurRadius = 9; 

    // Rectangle Drawing 
    UIBezierPath* rectanglePath = [UIBezierPath bezierPathWithRoundedRect: CGRectMake(59, 58, 439, 52) cornerRadius: 21]; 
    CGContextSaveGState(context); 
    CGContextSetShadowWithColor(context, shadowOffset, shadowBlurRadius, [shadow CGColor]); 
    [UIColor.redColor setFill]; 
    [rectanglePath fill]; 

    // Rectangle Inner Shadow 
    CGContextSaveGState(context); 
    UIRectClip(rectanglePath.bounds); 
    CGContextSetShadowWithColor(context, CGSizeZero, 0, NULL); 

    CGContextSetAlpha(context, CGColorGetAlpha([shadow2 CGColor])); 
    CGContextBeginTransparencyLayer(context, NULL); 
    { 
     UIColor* opaqueShadow = [shadow2 colorWithAlphaComponent: 1]; 
     CGContextSetShadowWithColor(context, shadow2Offset, shadow2BlurRadius, [opaqueShadow CGColor]); 
     CGContextSetBlendMode(context, kCGBlendModeSourceOut); 
     CGContextBeginTransparencyLayer(context, NULL); 

     [opaqueShadow setFill]; 
     [rectanglePath fill]; 

     CGContextEndTransparencyLayer(context); 
    } 
    CGContextEndTransparencyLayer(context); 
    CGContextRestoreGState(context); 

    CGContextRestoreGState(context); 
} 

En cuanto al tamaño de la forma que tiene que ajustar, tanto las sombras internas como externas borran el radio.

+0

parece que estás usando un rectángulo? ¿Cómo harías esto con un golpe? – ninjaneer

+0

@Ninja sí, es un rectángulo, ¿quieres dibujar la línea en 'touchesMoved' y el mismo efecto? – mohacs

+0

No estoy seguro de cómo eso afectaría el rendimiento, pero si logra el efecto en una trayectoria de carrera, entonces estaría bien. – ninjaneer

1

Probablemente esta no sea la respuesta perfecta, pero es lo mejor que puedo hacer para satisfacer mis necesidades.

Coge la FXBlurView: https://github.com/nicklockwood/FXBlurView

Usted puede dibujar los trazos en una FXBlurView o convertir su UIView a UIImage después de haber terminado el dibujo (usando el código que tomé de esta respuesta https://stackoverflow.com/a/22494886/505259):

+ (UIImage *) imageWithView:(UIView *)view 
{ 
    UIGraphicsBeginImageContextWithOptions(view.bounds.size, view.opaque, 0.0f); 
    [view drawViewHierarchyInRect:view.bounds afterScreenUpdates:NO]; 
    UIImage * snapshotImage = UIGraphicsGetImageFromCurrentImageContext(); 
    UIGraphicsEndImageContext(); 
    return snapshotImage; 
} 

y categoría de uso de FXBlurView en UIImage:

- (UIImage *)blurredImageWithRadius:(CGFloat)radius 
         iterations:(NSUInteger)iterations 
          tintColor:(UIColor *)tintColor; 

a difuminar la imagen resultante, dándole un pincel suave de Photoshop como apariencia.

Todavía estoy buscando una respuesta real. Tengo un proyecto OpenCV que requiere una réplica exacta de la herramienta de pincel suave de Photoshop.

0

He estado trabajando en dibujar la ruta con brillo interior, y de alguna manera tuve éxito (al menos para mi gusto).

Implementé el código de dibujo en la parte superior de levinunnick's Smooth-Line-View. El código tiene licencia de MIT, por lo que deberá agregarlo a su proyecto.

Actualmente puede asignar el color de línea, el ancho y la suavidad de la línea que desea dibujar. Tenga cuidado con la suavidad, use un flotador entre 0 y 1. He cambiado los métodos táctiles porque necesitaba acceder a los métodos de dibujo desde otra vista. Verifique el código original, si desea volver a los métodos táctiles.

No optimicé el código; si tiene una idea mejor, solo edite esta respuesta.

Aquí está el archivo H:

@interface LineView : UIView 
- (instancetype)initWithFrame:(CGRect)frame andColor:(UIColor *)lineColor andWidth:(CGFloat)lineWidth andSmoothness:(CGFloat)lineSmooth;  
- (void)touchStartedWith:(CGPoint)location;  
- (void)touchMovedWith:(CGPoint)location; 
@end 

Este es el archivo M:

#import "LineView.h" 

static const CGFloat kPointMinDistance = 0.05f; 
static const CGFloat kPointMinDistanceSquared = kPointMinDistance * kPointMinDistance; 

@interface LineView() 
@property (strong) UIColor *lineColor; 
@property (assign) CGFloat lineWidth; 
@property (assign) CGFloat lineSmooth; 

@property (assign) CGPoint currentPoint; 
@property (assign) CGPoint previousPoint; 
@property (assign) CGPoint previousPreviousPoint; 
@end 

@implementation LineView 
{ 
@private 
    CGMutablePathRef _path; 
} 

- (instancetype)initWithFrame:(CGRect)frame andColor:(UIColor *)lineColor andWidth:(CGFloat)lineWidth andSmoothness:(CGFloat)lineSmooth 
{ 
    self = [super initWithFrame:frame]; 
    if (self) { 
    _path = CGPathCreateMutable(); 

    if (lineSmooth < 0) lineSmooth = 0; 
    if (lineSmooth > 1) lineSmooth = 1; 

    self.backgroundColor = [UIColor clearColor]; 
    self.lineColor = lineColor; 
    self.lineWidth = lineWidth; 
    self.lineSmooth = lineWidth * (lineSmooth/4); 
    self.opaque = NO; 
    } 
    return self; 
} 

- (void)drawRect:(CGRect)rect 
{ 
    [self.backgroundColor set]; 
    UIRectFill(rect); 

    @autoreleasepool { 

    CGColorRef theColor = self.lineColor.CGColor; 
    UIColor *theClearOpaque = [[UIColor whiteColor] colorWithAlphaComponent:1]; 

    CGContextRef context = UIGraphicsGetCurrentContext(); 
    CGContextAddPath(context, _path); 
    CGContextSetLineCap(context, kCGLineCapRound); 
    CGContextSetLineWidth(context, self.lineWidth); 
    CGContextSetStrokeColorWithColor(context, theColor); 

    // Outer shadow 
    CGSize shadowOffset = CGSizeMake(0.1f, -0.1f); 
    CGFloat shadowBlurRadius = self.lineSmooth; 
    CGContextSetShadowWithColor(context, shadowOffset, shadowBlurRadius, theColor); 

    CGContextStrokePath(context); 

    if (self.lineSmooth > 0) { 
     // Inner shadow 
     CGRect bounds = CGPathGetBoundingBox(_path); 
     CGRect drawBox = CGRectInset(bounds, -2.0f * self.lineWidth, -2.0f * self.lineWidth); 

     CGContextSaveGState(context); 
     UIRectClip(drawBox); 
     CGContextSetShadowWithColor(context, CGSizeZero, 0, NULL); 

     CGContextSetAlpha(context, CGColorGetAlpha(theClearOpaque.CGColor)); 
     CGContextBeginTransparencyLayer(context, NULL); 
     { 
     // Outer shadow 
     UIColor *oShadow = [theClearOpaque colorWithAlphaComponent:1]; 
     CGContextSetShadowWithColor(context, CGSizeMake(0.1f, -0.1f), self.lineWidth/64 * self.lineSmooth, oShadow.CGColor); 
     CGContextSetBlendMode(context, kCGBlendModeSourceOut); 
     CGContextBeginTransparencyLayer(context, NULL); 

     [oShadow setFill]; 

     // Draw the line again 
     CGContextAddPath(context, _path); 
     CGContextSetLineCap(context, kCGLineCapRound); 
     CGContextSetLineWidth(context, self.lineWidth); 
     CGContextSetStrokeColorWithColor(context, oShadow.CGColor); 
     CGContextStrokePath(context); 

     CGContextEndTransparencyLayer(context); 
     } 
     CGContextEndTransparencyLayer(context); 
     CGContextRestoreGState(context); 
    } 
    } 
} 

- (void)touchStartedWith:(CGPoint)location 
{ 
    self.previousPoint = location; 
    self.previousPreviousPoint = location; 
    self.currentPoint = location; 

    [self touchMovedWith:location]; 
} 

- (void)touchMovedWith:(CGPoint)location 
{ 
    CGRect drawBox; 

    @autoreleasepool { 
    CGFloat dx = location.x - self.currentPoint.x; 
    CGFloat dy = location.y - self.currentPoint.y; 

    if ((dx * dx + dy * dy) < kPointMinDistanceSquared) { 
     return; 
    } 

    self.previousPreviousPoint = self.previousPoint; 
    self.previousPoint = self.currentPoint; 
    self.currentPoint = location; 

    CGPoint mid1 = midPoint(self.previousPoint, self.previousPreviousPoint); 
    CGPoint mid2 = midPoint(self.currentPoint, self.previousPoint); 

    CGMutablePathRef subpath = CGPathCreateMutable(); 
    CGPathMoveToPoint(subpath, NULL, mid1.x, mid1.y); 
    CGPathAddQuadCurveToPoint(subpath, NULL, self.previousPoint.x, self.previousPoint.y, mid2.x, mid2.y); 

    CGRect bounds = CGPathGetBoundingBox(subpath); 
    drawBox = CGRectInset(bounds, -2.0f * self.lineWidth, -2.0f * self.lineWidth); 

    CGPathAddPath(_path, NULL, subpath); 
    CGPathRelease(subpath); 
    } 

    [self setNeedsDisplayInRect:drawBox]; 
} 

- (void)dealloc 
{ 
    CGPathRelease(_path); 
    _path = NULL; 
} 
@end 
3

Usted puede obtener un efecto similar a lo que estamos tratando de lograr mediante la mezcla de su sombra con su stroke

CGContextRef context = UIGraphicsGetCurrentContext(); 
CGContextAddPath(context, path); 
CGContextSetLineCap(context, kCGLineCapRound); 
CGContextSetLineWidth(context, self.lineWidth); 
CGContextSetStrokeColorWithColor(context, [UIColor whiteColor].CGColor); 
CGContextSetShadowWithColor(context, CGSizeMake(0.f, 0.f), self.lineWidth/4, [self.lineColor CGColor]); 
CGContextSetBlendMode(context, kCGBlendModeMultiply); 
CGContextSetAlpha(context, self.lineAlpha); 
CGContextStrokePath(context); 

Con el modo de fusión Multiply, usando color blanco como color de trazo y configurando el color del pincel que querer la sombra, se obtiene el siguiente resultado:

enter image description here

He conectado la función de dibujo al evento touchesMoved, de manera de que cuanto más tiempo tarda en pintar una parte de la imagen, más dura es la " Pincel "dibuja (mira la línea negra).

Cuestiones relacionadas